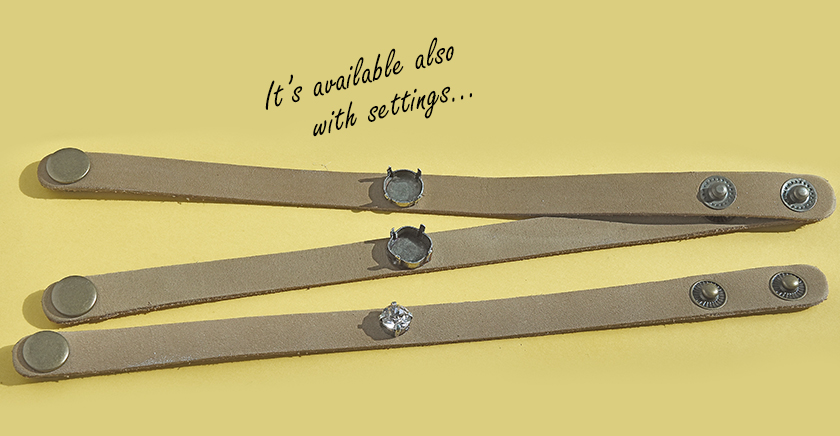
The cuff Leather is a popular product that many jewelry designers have loved for years.
At Gita it is sold with a button to close on the wrist.
The cuff Leather bracelets can be used as-is or as a base; you can glue, sew or engrave elements (with the help of a suitable laser machine).
Since GITA is all about making sparkling jewelry, In the following guide, we will see how to combine the cuff leather bracelet with crystals.
To achieve this sparkling appearance, we can either use flat-back rhinestones and glue them directly on the leather surface; or use pointed back rhinestones with matching metal settings.
Although the flat back crystals have a different depth and sparkle than the pointed back crystals, it still looks pretty and reaches similar results.
Of course, you can combine flatbacks and pointed back crystals (as in the example below) and create a piece of jewelry with different heights and still maintain the metallic look that the stone settings add.
You can find GITA's wide selection of pointed back crystals and flatback crystals here.

Another advantage of using crystals and stone settings and metal elements as the decoration to your cuff leather bracelet is the color of the metal as we mentioned before.
At GITA you can choose all the metal components from 17 different metal plating finishes like yellow gold, shiny silver, nickel, matte gold, bronze, copper, and more.
Below - which cuff leather bracelet do you choose? Wide or narrow?


So where do you start? Very simple and fun!
In the beginning, choose the leather bracelets base (thin or wide).
We suggest you "experiment" with different placements of crystals before gluing.
After you find the most suitable placement for you, use a pencil and mark the exact location of the stone settings/element you want to glue.
It is better to embed the crystals into the settings before gluing them. To embed the crystals, use the prongs pusher tool to close the prongs and secure the crystal in its place.
Then, apply a small amount of glue on the setting's bottom side, place the settings (with the crystals) or the metal element on the leather base, and press, hold for a few seconds and release. The glue dries quickly, but it is advisable to wait 24 hours until the glue is completely dry for complete certainty.
Pay attention - too much glue can lead to leaks and stains around the stone settings.
The image below uses prongs pusher tool to embed the crystals and rhinestones inside their settings.

Pictured below is a selection of Swarovski, Aurora, or Preciosa crystals and GITA’s settings

We recomend you first to embed the crystals into the stone settings, close and only than to glue it on the leather.

Another option is to use a leather punch tool to make holes, then can insert jump rings there and hang charms.

In the pictures below - are some examples of gluing different parts on the cuff leather
from left to right:
-
Thin cuff leather bracelet with Rivoli pointed back stone settings and chatons embedded with Swarovski crystals.
-
Wide leather bracelet with a mix of stones in the shape of navette + chatons
-
In the three bracelets on the left, we used different metal elements in which we inlaid PP crystals.
-
In the last example, we punctured a hole in the cuff leather and hung using a simple jump ring connected to a metal cast charm.

Pictured below are more examples of connecting loops and using different charms and metal castings for embedding.


Click here to shop
Recomended articles:
GITA's metal jewelry by sets
10 Helpful Tips for a Beginner Jewelry Designer
A useful jewelry sizes guide for the jewelry designer
The tools you need for jewelry making
The best ways to embed crystals
GITA’s guide for gluing crystals
And have fun creating:)